
This Rhubarb Custard Pie is super easy. A par-baked pie crust is filled with chopped rhubarb and then covered with a sour cream custard. This Rhubarb Custard Pie is similar to a Rhubarb Clafoutis or Rhubarb Flan, and is a great make-ahead dessert. It is a great starting point if you are learning how to bake with rhubarb!

Table of contents
- Rhubarb Custard Pie
- How to make Rhubarb Custard Pie
- Preparing Rhubarb for Baking
- Tips for how to avoid a soggy bottom pie
- How to line a pie pan with pie dough.
- How to Par bake a pie crust
- The secret to easy to work with pie dough
- Butter lumps in your pie crust?
- Metal vs Ceramic vs Glass pie plates
- FAQ for Recipe
- For more Rhubarb recipes, check out:
Rhubarb Custard Pie
Hi hi! Popping in pretty late in the rhubarb season to bomb you with a whole bunch of rhubarb recipes - I shot these all a few months ago with full intentions of sharing them before now, but we were in the middle of sneakily moving to New Zealand. Turns out an international move during a pandemic takes up a lot of time, so here I am with a bunch of rhubarb recipes late in the season. Sorryyyy.
This Rhubarb Custard pie is a re-make of a recipe I posted here in 2017 and is a dessert I grew up eating. The original recipe comes from the book 'The Best of Alison Holst' (the one with the red cover, if you know you know), and we knew it as 'rhubarb flan'. Mum and Dad have a rhubarb plant in their garden that grows year round so I used to make this all the time.
This rhubarb custard pie is super easy to make. The original used store bought puff pastry but I levelled up with a par baked pie crust, and kept the rest of the recipe the same. You fill the crust with chopped rhubarb, top it with a sour cream custard, and then bake the whole thing until it's done. It's super easy and just so, so good, and the rhubarb flavour really shines through. It's my favourite.


How to make Rhubarb Custard Pie
There's not too many steps for making this rhubarb custard pie. It is essentially a rhubarb clafoutis, just with a crust. Super easy.
- Make the pie dough - I like to do this ahead of time to give it overnight to chill. I also like to make bulk pie dough and keep some in the freezer so that whenever I need it I can just defrost it, so I will often make extra. This recipe makes enough for two single crust pies - just pop the other disc of dough in the freezer for another time.
- Par bake the pie crust - This kick starts the baking of the pastry. This can also be done ahead of time.
- Prepare the rhubarb - The rhubarb gets chopped up and popped into the cooled par-baked pie crust.
- Add the custard and bake - The other component of this rhubarb custard pie is a sour cream custard. This is just a whisk together situation - whisk it up and pour over the rhubarb. Then pop the whole thing into the oven and bake until done.
- Chill and serve - This rhubarb custard pie cuts best when it is chilled, so let it cool slightly then throw the whole thing in the fridge to cool down before serving.


Preparing Rhubarb for Baking
If you haven't baked with rhubarb before, this rhubarb custard pie is a great place to start. Preparation wise, you can treat rhubarb a lot like celery. It can be a little stringy, so I like to use my fingernail to just see if I can lift any fibre from the flat part of the stalk by starting at the end and seeing if any lifts off. If you can, pull the stringy stuff off and discard, if not then no worries.
The leaves of rhubarb are poisonous so you will often see it sold without them. To prepare the rhubarb just chop it into thin slices. This can be done ahead of time if you like.
To freeze rhubarb just pop it into an airtight bag and freeze. I prefer to freeze it once it is already chopped up.

Tips for how to avoid a soggy bottom pie
The par bake on this rhubarb custard pie is essential to avoiding a soggy bottom. It kick starts the baking process of the crust, so it gives it a barrier against the liquid in the filling. It also means that the bottom of the crust has started to bake too. This means you will have a nice flaky pie crust to fill your pie with the wet filling.
If you didn't par-bake your crust you would have to bake the pie at too high of a temperature for the custard in order to bake the crust properly, which would cause all sorts of issues with the custard.

How to line a pie pan with pie dough.
Make sure you start with nice cold pie dough - ideally it will have been chilling for at least two hours or up to overnight.
- Roll out your crust - I like to use a wooden french rolling pin for pie crust but you can use whatever you like! Roll to a circle a little larger than your pie pan.
- Transfer your pie dough to the pan - Flop the dough into the pan and make sure to settle it within the pan so that it doesn't slump.
- Trim if needed - If you have loads of overhang, or your dough isn't a perfect circle, you can trim the edges with some kitchen shears
- Fold and tuck the edges under - Tuck the edges of the crust under themselves to form an edge on your pie dough - this will be what you crimp.
- Chill - At this point, pop your pie dough into the fridge just for a wee bit to allow it to chill down before you crimp.
- Crimp - I like to keep this pretty basic and just do a thumb and fingers crimp, but you can do whatever you like here.
- Chill again - You can freeze your crust here if you want, but I prefer to chill it for about half an hour instead, which I find helps it to keep its shape well in the oven when baking.
How to Par bake a pie crust
The process for par baking a pie crust is pretty simple - it takes a little practice to get the crimp on the crust right, but par baking is a great skill to know how to do!
- Fill with beans or weights - Prick the crust all over, then cover with a crunched up piece of parchment paper. Fill the crust right to the edges with either weights or beans.
- Par-bake - Par bake the pie crust for 15-18 minutes with the weights in, then remove the weights and return the crust to the oven. This second bake is just for a few minutes and will set up the crust that was covered by the paper.
You can par-bake crust ahead of time - just leave it to cool then store lightly wrapped in plastic wrap in an airtight container for up to a day.

The secret to easy to work with pie dough
I use a little tip that my baking bestie Erin Mcdowell taught me - to laminate my pie dough after making it but before rolling it out for use. What this does it pops a few layers within the pie dough. This makes it homogenous and easy to work with but also still nice and flaky. So you get the best of both worlds - flaky AF pie dough which is super easy to work with. Here's how you do this:
- Make your pie dough - For this recipe I make the dough then form it into a rectangle. Then I wrap tightly in plastic and chill for only an hour. This gives the butter time to chill down enough that it won't melt everywhere when you roll it out.
- Roll out and perform turn 1 - Roll the dough into a large rectangle on a lightly floured surface. Then brush off any excess flour and perform a letter fold - where you fold it like a business letter.
- Perform turns 2 and 3 - Repeat the process again two more times. Your dough should be super homogenous at this point!
- Divide and shape - At this point I split the dough in two and shape each into a disc rather than roll out and laminate each piece individually. Works much better. If you're using it for a lattice top, shape into a rectangle. Starting with the shape you are wanting to achieve makes rolling out much easier!
- Chill again - Either chill your dough for at least 2 hours or overnight, or freeze for another time.
Butter lumps in your pie crust?
If your butter lumps were too big when you were initially mixing, this rolling out process will be hard. Make sure you incorporate them enough. You want some lumps of butter still in your dough, but not so many that the dough seems lumpy when you roll it out.

Metal vs Ceramic vs Glass pie plates
This is a question that I get often, and I know preference varies from baker to baker. I prefer a metal pie plate. The bottom of the pie gets a good bake, and it is easy to release from the pan. Others prefer ceramic or glass. However, both of those do not conduct heat as well, so things will take a little longer and may bake differently.
There is also the risk of breakage with glass and ceramic. I sometimes pop my crust into the freezer first then into the hot oven. You can't do that with a ceramic or glass pan as you risk the breakage.
Basically, you do you here, but I much prefer a metal pan! I have linked a favourite of mine in the FAQ section.

FAQ for Recipe
Probably, but I haven't tried it (or ever used store bought crust as it wasn't a thing for us growing up!). I assume you would par-bake it first and then proceed with the recipe!
You could add some berries along with the rhubarb (which is technically a vegetable) to the pie before adding the custard. Just sub in an equal amount by weight. If you add blueberries you could also rub some lemon zest into the sugar before making the custard.
Yes! It is great to make in advance - it actually needs to be well chilled before cutting to ensure that it cuts cleanly. You can make it a day in advance and store lightly wrapped in the fridge.
The outside edges will be set, and the middle of the pie will be just jiggly.
That's all good - it's totally normal!
I use a vintage aluminium pie plate that I got off of ebay, but this one is a great starter for a pie plate!
I use these ceramic pie weights. I got a couple of sets of them as one isn't enough. However uncooked beans or rice also work great - just set them aside as your baking beans as you can't eat them after they have been baked! My friend Stella also uses sugar!
A little butter leakage is ok but your crust shouldn't be pouring out butter. If it is, you haven't incorporated the butter enough in the initial mixing stage. Then when it hits the oven, it all leaks out.

For more Rhubarb recipes, check out:
- Blueberry Rhubarb Slab Pie
- Roasted rhubarb brioche doughnuts
- Rhubarb Frangipane Slab Pie
- Rhubarb Streusel Muffins
- Brown Butter Hazelnut Strawberry Rhubarb Crumb Bars
Made this recipe and love it?
If you made this recipe then I would LOVE for you to leave me a review below to let me know how you liked it! Also, please make sure to tag me on Instagram if you make it!
A note on salt and oven temperature
It is important to note the type of salt that is called for in a recipe. I use Diamond Crystal salt throughout my recipes - if you use a different sort of kosher salt or regular table salt you will need to adjust accordingly as some salt is 'saltier' than others. Morton's salt is twice as salty, so you will need half the quantity. Same goes for a regular table salt. I am working to get gram measurements throughout my recipes for salt but still getting there.
All oven temperatures are conventional unless otherwise stated. If you are baking on fan / convection, you will need to adjust the temperature. An oven thermometer is a great investment to ensure that your oven is the correct temperature.
Using the double / triple function in the recipe card
You will notice that there is a '1X' '2X' '3X' button in my recipe card. This can be used for doubling or tripling a recipe. However, please note that this only doubles the ingredient quantities in the ingredients list and NOT in the method. If there are quantities or pan sizes in the method of the recipe (for example weigh out 150g brown butter), you will need to scale this number manually. It will also not change the baking time in the recipe so you will need to adjust this yourself too. It is always a good idea to read through a recipe fully before doubling it just to check this. If you would like to scale this recipe or convert for another pan size, use my calculator!
Tools and equipment
For a list of my go-to tools and equipment, I have a post you can refer to here.
Why is this recipe in grams?
I post my recipes in grams as it is the most accurate way to bake. Cups are not only inaccurate but they vary in volume worldwide. There is no way for me to provide one cup measure that works for everyone. However, posting in weight fixes this issue. If you would like the recipe in cups you are welcome to convert it yourself via google, but please do not ask me to do it for you as I am not comfortable providing a recipe using a method that I have not tested. Baking with a scale is easy, accurate, and also makes cleanup super simple. Here is the scale that I use if you would like a recommendation! Here's to accurate baking!
Print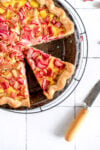
Rhubarb Custard Pie
- Author: Erin
-
 Prep Time: 1 hour
 -
Cook Time: 1 hour
-
Total Time: 4 hours
-
 Yield: One 9" pie
 -
 Category: Pie
 -
 Method: Baking
 -
 Cuisine: New Zealand
Description
This Rhubarb Custard Pie is super easy. A par-baked pie crust is filled with chopped rhubarb and then covered with a sour cream custard. This Rhubarb Custard Pie is similar to a Rhubarb Clafoutis or Rhubarb Flan, and is a great make-ahead dessert. It is a great starting point if you are learning how to bake with rhubarb!
Ingredients
Pie Dough (makes enough for two single crusts)
- 375g all-purpose flour
- Pinch of Salt
- 2 tsp (8g) sugar
- 225g cold unsalted butter, cut into cubes
- 240g cold water
- 1 cup ice
- 60g Apple cider vinegar
- Egg wash - 1 egg whisked with 1 Tbsp water
Rhubarb Filling
- 450g thinly sliced rhubarb
- 4 eggs, at room temperature
- 150g sour cream, at room temperature
- 130g granulated sugar
- 1 tsp vanilla bean paste or extract
- ¼ tsp salt
Instructions
PIE DOUGH
- Place flour, sugar and salt into a large bowl. Cut butter into chunks, and add to the flour. Toss lightly to coat.
- Working quickly, using a pastry blender or your fingers, cut the butter into the flour mixture until there are only large pea-sized chunks left. You want a few lumps of butter remaining to keep the pastry nice and tender.
- Combine ice, water and cider vinegar in a bowl. Sprinkle a few tablespoons of the ice water into the flour and butter mixture, and using a stiff spatula or your hands, mix in well. Continue adding water a tablespoon at a time ( I usually start with about 120g liquid, mix that in, then go from there and add additional liquid as needed) until you have a dough that holds together well, but is not too wet.
- Squeeze together with your fingertips to make a homogenous dough. Shape into a rectangle, Rest in the fridge for one hour.
- Roll out the dough on a floured surface into a rectangle, fold it in thirds like a letter, then roll again and repeat the folding. Repeat this process one more time. Divide the dough into two pieces, and shape each into a disc by folding the edges under. Rewrap tightly in plastic, and rest for at least two hours, or preferably overnight, before using.
- Once the dough has rested, unwrap one disc and place on a lightly floured surface. Roll out to ¼” (6mm) in thickness, turning the dough 45˚ often as you are rolling to keep it even. You want the circle to be slightly larger than your pie tin. Transfer to a 9” pie tin, and arrange to ensure that the dough is well settled.
- Trim the dough using scissors or a sharp knife, leaving about one inch excess around the edges. Gently tuck the dough under and onto itself, to give you a neat folded edge. Chill in the fridge for 15-20 minutes, then remove from the fridge and crimp as desired. Dock all over with the tines of a fork, then chill for a further 30 minutes, or freeze for 20 minutes or until solid.
- While the crust is in the fridge, preheat the oven to 425˚f / 220˚c. Cut a piece of parchment slightly larger than the pie dish. Line with the parchment paper and fill with pie weights or dried beans, filling right to the bottom of the crimps.
- Place the pie tin on a baking sheet, and place in the oven. Bake for 18-20 minutes, or until the edges are slightly golden brown. Remove from the oven, remove the parchment paper and beans. Return to the oven and bake for a further 2-3 minutes, until the inside of the crust is set and barely golden.
- Remove from the oven and allow to cool completely. Keep the oven on, but drop the temperature to 350°f / 180°c.
RHUBARB FILLING
- If you haven't already, drop the oven temperature to 350°f / 180°c.
- Place the cooled par baked pie shell (in the pie pan) onto a baking sheet. Arrange the chopped rhubarb inside the shell.
- In a medium bowl, whisk together the eggs, sour cream, sugar, vanilla, and salt until well combined.
- Pour the custard mixture over the rhubarb - you may have a tiny bit left behind depending on the size of your pie pan.
- Move some of the rhubarb around to settle it if needed - sometimes little air bubbles can get stuck underneath. Top up with custard if needed. If you're worried about it spilling, you can put the pie in the oven first and then add the additional custard. Don't feel like you have to add all of it though.
- If you have big bubbles on the top of your custard, you can either pop them with a knife or quickly blow torch them to get rid of them.
- Transfer the pie to the oven and bake for about 60 minutes. The custard will puff up slightly and you want the edges to be set and the inside still just a tiny bit jiggly.
- Remove from the oven and allow the pie to cool on the tray for about 20 to 30 minutes, then transfer to the fridge and allow to chill completely. I like to put the pie in the fridge on a wire rack to allow air flow underneath too.
- Once cold, cut into slices. Serve with whipped cream or ice cream.
- Store leftovers in an airtight container in the fridge.
Notes
Make sure that the pie is totally chilled before you cut into it - this will help you to get super clean slices!
Recipe slightly adapted from 'The Best of Alison Holst'
Keywords: Rhubarb, Pie, Rhubarb Custard Pie, Single crust pie
The post Rhubarb Custard Pie appeared first on Cloudy Kitchen.


