
This Mini Chocolate Layer Cake is the perfect size. It has two six inch chocolate cake layers, a balsamic berry cake filling, and silky chocolate Swiss meringue buttercream. The Balsamic Berry Cake Filling can be made with fresh berries or frozen berries so is perfect for using up anything you might have in the freezer. This Small Batch Chocolate Cake comes together quickly and easily, and is the perfect size for a small celebration, or any time you need a small batch cake baking project!
Thank you to Filippo Berio for sponsoring this post! All opinions are my own. Thank you so much for supporting the businesses who support Cloudy Kitchen!
Thank you to Filippo Berio for sponsoring this post! All opinions are my own. Thank you so much for supporting the businesses who support Cloudy Kitchen!

Table of contents
- Mini Chocolate Layer Cake
- Small Batch Chocolate Cake with Chocolate Swiss Meringue Buttercream
- Balsamic Berry Cake Filling
- How to make Chocolate Swiss Meringue Buttercream
- Tips and Tricks for the Perfect Small Batch Chocolate Cake
- How to make a Buttercream Dam
- Steps for assembling a layer cake
- How to keep cake leftovers fresh for longer
- FAQ for Small Batch Chocolate Cake
- For more Small Batch Cake Recipes, check out:
Mini Chocolate Layer Cake
Hi hi! Just popping in here to share this recipe for a Mini Chocolate Layer Cake. I have become completely obsessed with all things small batch. Mini layer cakes (particularly two layer cakes like this one) are super fun to make and a wee bit less stressful than your average layer cake.
I took my favourite chocolate cake recipe (which I have just finished developing), and layered it with a berry balsamic filling and a silky chocolate Swiss Meringue Buttercream. The components can be made in advance and the cake keeps super well in the fridge. This is a great wee chocolate situation to throw together whenever you need something a wee bit special - I love it so much and I really hope you do too!


Small Batch Chocolate Cake with Chocolate Swiss Meringue Buttercream
There are a couple of simple wee things that make this mini chocolate layer cake so easy, but so, so good. The chocolate cake is delicious with the frosting, but to me, the balsamic berry filling made with Filippo Berio Balsamic Vinegar really takes this over the edge.
- Only two layers - A two layer cake is much easier to put together than a three layer cake. You only have to worry about doing one layer of filling between, and because it is nice and short, it is much easier to frost! I kept this one simple with some easy swoops on the outside.
- Super rich chocolate cake - blooming the Dutch cocoa in hot water before adding it to the batter gives you a perfectly rich chocolate cake.
- Incredibly easy to make - the cake layers are a stir together situation and can just be made with a bowl and a whisk (and a scale of course)
- Light but rich cake - The chocolate cake layers are the perfect texture, and pair perfectly with the berry filling and chocolate frosting. The texture is thanks to the use of oil in the batter to provide fat and moisture.
- Super smooth chocolate Swiss meringue buttercream - Chocolate Swiss meringue buttercream tastes a little like room temperature ice cream. I love it so much. It is creamy and smooth, and I used both melted chocolate and cocoa in it for an amazing depth of flavour.
Balsamic Berry Cake Filling
Balsamic is a great way to provide an easy depth of flavour in the filling and pairs amazingly with berries. It cuts through the chocolate in the cake for the perfect pairing. I used the Balsamic Vinegar from Filippo Berio. I always have the vinegar on hand for baking but also for things like making salad dressing or finishing vegetables. It is an amazing all around vinegar, but I love how it pairs with the berries for this cake! The filling is super easy to make. It can be made with fresh or frozen berries so is great for using up any stray bags of berries you may have in your freezer.

How to make Chocolate Swiss Meringue Buttercream
I used a chocolate Swiss meringue buttercream for this recipe. Swiss meringue buttercream, as you can tell by the name, is based on a Swiss meringue. A Swiss meringue is made by cooking egg whites and sugar together over a double boiler. The mixture is then whipped until stiff peaks form. Butter is incorporated a little at a time, until it is emulsified in. The result is a thick, creamy, silky buttercream. To make chocolate Swiss meringue buttercream you simply pop a little melted chocolate and cocoa powder in at the end.
Swiss meringue buttercream is not a crusting buttercream like American buttercream is (American buttercream is based on powdered sugar and butter), so it is super smooth to work with. You can take your time if you need as you are not worrying about it crusting over. The best. It can take a tiny bit of practice to get right, but once you have it nailed, the flavour combinations are endless.


Tips and Tricks for the Perfect Small Batch Chocolate Cake
There are a couple of wee tricks I use when making this mini chocolate cake to make it extra rich and the perfect texture.
- Bloom your cocoa - Adding the cocoa to boiling water rather than in with the dry ingredients. Lots of cakes add boiling water or hot coffee at the end. I took this one step further by mixing the cocoa and espresso powder directly with the boiling water to make a paste. Blooming the cocoa brings out the ultra rich flavour, making your cake next level chocolatey.
- Bake at a lower temperature - I have been playing around with this for a long time - working out how to make a cake which doesn't dome too much, without having to use cake strips (which are helpful but fiddly and I don't like them). The answer is a combination of batter consistency, leavener, and oven temperature. Dropping your oven temperature to 325°f (160°c) means the cake rises more evenly, reducing the chances of it doming.
- Use oil rather than butter in your cake - Chocolate cakes use oil for a reason. Using a neutral oil in a cake provides moisture, and because the flavours are already so rich, it does not need butter for flavour or for structure like vanilla cakes or cakes which rely on the creaming method do. I love using Filippo Berio's Extra Light Olive Oil, which is super light in flavour. I use it as a neutral oil recipes, and also for every day cooking.

How to make a Buttercream Dam
The best way to help keep your filling inside your mini chocolate layer cake is to use a buttercream dam. This is a circle of frosting piped around the outside of the cake which literally acts as a dam to hold in the filling. Adding your layer of buttercream frosting onto the layer before the dam creates a seal between the dam and the cake. This stops any leaking. The buttercream layer on the cake also stops the filling soaking into the cake and going soggy. If your buttercream feels a little warm and you are worried about the dam, there are two options:
- Add your buttercream to the cake layer, then pipe the dam, then pop the whole thing in the freezer for about 5 minutes to firm up the ring of frosting. This will ensure that it doesn't go anywhere when you add the filling.
- Pipe the dam on, fill it with filling, set the second layer of cake on top, and spread a very thin layer of buttercream on the outside of the cake (not the crumb coat, just around where the join is), then freeze that or chill it down just to lock everything in place. This means that when you crumb coat and finish your cake, you won't have to worry about the layers moving, which can happen if the buttercream is too soft.
- Remember that if at any time during the process it seems like the cake layers are moving a little or the buttercream feels too warm - just pop it in the fridge for a little bit. That is the great thing about Swiss meringue buttercream as it doesn't crust. You can work on your own time.


Steps for assembling a layer cake
Here are the steps I take to assemble a filled layer cake like this one. Remember at any point you can pop it into the fridge if you need to.
- Level off cakes if desired.
- Place the first layer of cake onto the serving platter or turntable. I like to secure it with a little buttercream.
- Add buttercream to the first layer of cake and smooth using an offset spatula. You can spread a little around the sides at this point too if you want to.
- Pipe a buttercream dam around the outside edge of the first layer of cake (see images).
- Add the filling inside the buttercream dam.
- Put on the second layer of cake - I like to add this one upside down so that the top of the cake is flat.
- Add a little buttercream where the two cake layers join and smooth out. At this point you can chill the cake if you like to ensure the dam holds firm.
- Crumb coat the cake - this is a thin layer of buttercream over the whole surface of the cake.
- Add your second layer of buttercream frosting to the top and sides of the cake and finish as desired.
How to keep cake leftovers fresh for longer
I have a sneaky wee trick to keeping cake fresh for as long as possible - leftover buttercream. If you have any buttercream leftover, keep it! Cut as many pieces of the cake as you like, but leave the rest of it intact. Once you are done, spread the leftover buttercream directly against the cut surface of the cake. Smooth it so it joins with the buttercream on the outside of the cake. Then, pop the whole thing into the fridge to harden slightly, then wrap in plastic wrap or place in an airtight container. The buttercream prevents air from coming into contact with your cake, keeping it nice and fresh!

FAQ for Small Batch Chocolate Cake
Yes, that should work just fine. You can double it and bake in two 8" pans.
I have Fat Daddio's pans - the 3" high ones. They are great quality - I have had them for years (I just checked and I got them in 2015!) and they are still in perfect condition! I own three 6" pans and 3 8" pans and they stack up super nicely.
Yes! you can use any frosting that you like. The chocolate American Buttercream from my Funfetti cake would work great, or this Vanilla Bean Swiss meringue buttercream.
Yes, you can use whatever you like - just make sure the total weight of 400g is the same.
I haven't tried it, but dutch cocoa and regular aren't necessarily interchangeable due to the nature of them. Regular cocoa is acidic whereas dutch process cocoa has been put through an alkalising process. However this recipe uses both baking powder and soda so you are welcome to try, I just don't know how you would get on.
Yes, that should be fine! You may not be able to get super super stiff peaks on your meringue but just make sure it is relatively thick and that it is not too warm. If you are using an electric mixer you may want to use butter that is room temperature or just slightly cooler than room temperature rather than cold, as the mixer is less powerful and won't incorporate it the same as a stand mixer.
I use lids from my soda stream bottles, but you can use anything that is the right height. I line them up with the edge of the cake and use them as a guide for my bread knife so that I cut evenly and don't cut down too far. Egg cups or little bowls would work great too depending on what you have.
Yes! The filling can be made up to a week in advance. The cakes can be made and tightly wrapped in plastic wrap and frozen for at least a week. Leave to defrost slightly before assembling. Buttercream can be made and frozen too - just bring it to room temperature and then re-whip.
You can use either! I used frozen.
I have a little clear plastic disc that my husband cut me out on the laser cutter, but you can use a cardboard cake round, or just assemble it directly onto the plate that you are serving it on!
I had a little leftover filling (I always go for a tiny bit more in recipes so you're never caught short) and I popped it on some yoghurt for breakfast!
I have this ateco turntable. It is super helpful to have and spins really smoothly.

For more Small Batch Cake Recipes, check out:
Made this recipe and love it?
If you made this recipe then I would LOVE for you to leave me a review below to let me know how you liked it! Also, please make sure to tag me on Instagram if you make it!
A note on salt and oven temperature
It is important to note the type of salt that is called for in a recipe. I use Diamond Crystal salt throughout my recipes - if you use a different sort of kosher salt or regular table salt you will need to adjust accordingly as some salt is 'saltier' than others. Morton's salt is twice as salty, so you will need half the quantity. Same goes for a regular table salt. I am working to get gram measurements throughout my recipes for salt but still getting there.
All oven temperatures are conventional unless otherwise stated. If you are baking on fan / convection, you will need to adjust the temperature. An oven thermometer is a great investment to ensure that your oven is the correct temperature.
Why is this recipe in grams?
I post my recipes in grams as it is the most accurate way to bake. Cups are not only inaccurate but they vary in volume worldwide. There is no way for me to provide one cup measure that works for everyone. However, posting in weight fixes this issue. If you would like the recipe in cups you are welcome to convert it yourself via google, but please do not ask me to do it for you as I am not comfortable providing a recipe using a method that I have not tested. Baking with a scale is easy, accurate, and also makes cleanup super simple. Here is the scale that I use if you would like a recommendation! Here's to accurate baking! If you would like to scale this recipe or convert for another pan size, use my calculator!
Print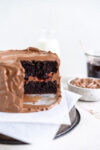
Mini Chocolate Layer Cake
- Author: Erin
-
 Prep Time: 60 minutes
 -
Cook Time: 30 minutes
-
Total Time: 3 hours
-
 Yield: 8 servings
 -
 Category: Cake
 -
 Method: Baking
 -
 Cuisine: American
Description
This Mini Chocolate Layer Cake is the perfect size. It has two six inch chocolate cake layers, a balsamic berry cake filling, and silky chocolate Swiss meringue buttercream. The Balsamic Berry Cake Filling can be made with fresh berries or frozen berries so is perfect for using up anything you might have in the freezer. This Small Batch Chocolate Cake comes together quickly and easily, and is the perfect size for a small celebration, or any time you need a small batch cake baking project!
Ingredients
Balsamic Berry Cake Filling
- 250g Blueberries, fresh or frozen (if frozen do not thaw)
- 150g Raspberries, fresh or frozen (if frozen do not thaw)
- 85g granulated sugar
- 25g Filippo Berio Balsamic Vinegar
- ¼ tsp kosher salt
Small Batch Chocolate Layer Cake
- 160g All-purpose flour
- 165g granulated sugar
- ½ tsp kosher salt
- ¾ tsp baking powder
- ½ tsp baking soda
- 2 large eggs, at room temperature
- 145g whole milk, at room temperature
- 80g Filippo Berio Extra Light Olive Oil
- 1 tsp vanilla extract or vanilla bean paste
- 1 tsp espresso powder
- 50g dutch process cocoa
- 135g boiling water (boil water then weigh out)
Chocolate Swiss Meringue Buttercream
- 95g egg whites, at room temperature
- 145g granulated sugar
- ¼ tsp salt
- 340g unsalted butter, either cold from the fridge or cool, cut into chunks
- ½ tsp vanilla bean paste or extract
- 190g dark chocolate (about 70% cocoa solids), melted and cooled
- 7g dutch process cocoa (optional)
Instructions
BERRY BALSAMIC FILLING
- Place all the ingredients in a small saucepan. Place over medium heat, and cook, stirring often, until the mixture comes to a boil. Cook for a further 5-6 minutes, then strain the mixture, reserving the fruit, and returning the liquid to the pan.
- Cook the liquid, stirring constantly, for 2-3 minutes or until reduced slightly. Return the reserved fruit to the pan and mix well to combine. Transfer to a container, cover, and place in the fridge to chill completely.
SMALL BATCH CHOCOLATE LAYER CAKE
- Preheat the oven to 325°f / 160°c. Grease and line two 6" cake pans with parchment paper circles.
- In a medium bowl, whisk together the flour, sugar, salt, baking powder, and baking soda. In a separate medium bowl, whisk together the eggs, milk, oil, and vanilla.
- Add the wet ingredients to the dry ingredients and mix to incorporate.
- Boil the water and place the cocoa and espresso powder in a medium bowl (I use the same one I just used for the wet ingredients). Weigh the water directly into the bowl, then mix to combine until it forms a paste. Ensure that there are no lumps.
- Add the cocoa powder paste to the bowl with the cake batter in, and whisk well to combine.
- Divide the cake batter between the two pans using your scale (approximately 420g per pan). Get rid of any big bubbles by banging the pan on the counter top.
- Bake the cakes for 35 to 40 minutes, or until a tester inserted into the centre comes out clean or the middle bounces back when lightly pressed.
- Remove the cakes from the oven and leave to cool in their pans for 10 minutes then transfer to a cooling rack and remove the parchment paper and leave on the rack to cool completely.
CHOCOLATE SWISS MERINGUE BUTTERCREAM
- Place the egg whites, sugar and salt in the bowl of a stand mixer or a heat proof bowl. Place over a pot of simmering water, ensuring that the water does not touch the bowl. Heat, whisking constantly, until the mixture registers 160˚f / 70˚c on a thermometer and the sugar has dissolved.
- Carefully transfer the bowl to the mixer, and fit with the whisk attachment. Whip the egg whites on high until they are snowy white and fluffy, 8-10 minutes. Add the butter one chunk at a time. The mixture may look curdled - but just keep mixing! Once all the butter is incorporated, mix on high for a further 10 minutes. Add the vanilla and mix until incorporated.
- While the buttercream is mixing, melt the chocolate in a small heatproof bowl in 30 second increments in the microwave. Set aside to cool slightly.
- Once the buttercream has finished mixing, and is smooth and silky, add in the cooled chocolate, and sift in the cocoa. Mix for a further 2-3 minutes, then switch to the paddle attachment and mix on low for one minute to remove any air.
ASSEMBLY
- Level off the cakes if desired.
- Transfer some of the buttercream to a piping bag fitted with a medium round tip or just with the end snipped off - this will be used to make a buttercream dam to hold in the berry filling between layers.
- Secure one of the layers of cake to a cake turntable or serving platter using a little buttercream. Add about half a cup of buttercream onto the first layer of cake, and smooth using an offset spatula.
- Create a buttercream dam using the buttercream in the piping bag by piping a ring of frosting around the outside edge of the first layer. Fill in the ring with the berry balsamic filling (leave any extra juicy stuff behind, you may not need all of it).
- Place the second layer of cake onto the first, upside down to give you a flat top edge, pressing very lightly to secure, and sealing the joins with a layer of buttercream. At this point I like to pop the cake into the freezer just for 10 minutes to ensure the buttercream dam will hold strong.
- Crumb coat the cake - to do this, apply a thin layer of buttercream over the entire surface of the cake (top and sides), and smooth with a bench scraper or icing smoother. You can chill the cake now if you like, or you can continue on frosting it. I like to chill it if I am giving it a smooth finish, but found I do not need to if it is a rustic one like this.
- Apply a second, slightly thicker layer of buttercream over the entire surface of the cake (top and sides), and smooth off briefly with an offset spatula and scraper. Using your offset spatula, create swoops in the frosting. Smooth off the top edge. Alternatively, finish as desired.
- Store in the fridge until serving. Allow to stand at room temperature for 20-30 minutes before serving. Store leftovers in the fridge (see note in blog post about how I like to keep layers fresh).
Keywords: chocolate cake, small batch, chocolate layer cake, swiss meringue buttercream, buttercream, balsamic berry, mini chocolate cake
The post Mini Chocolate Layer Cake appeared first on Cloudy Kitchen.


