
These super easy butter cookies use one bowl, six ingredients, and make a tender and buttery butter cookie with a melt in your mouth texture. These butter cookies can be piped out and baked fresh, so ready in just under 30 minutes, or they can be prepared ahead and chilled or frozen until you are ready to bake them. Finish them with granulated sugar, dip half in chocolate, or add your favourite glaze or icing.

Hi hi! I am just popping in to share this super easy butter cookie recipe! This came about when I accidentally went on a deep dive finishing of the testing for my Thumbprint Cookies and Snowball Cookies, which got me wondering if the dough can be used for butter cookies too.
Turns out, it cannot - it somehow was too hard to pipe and also super melty in the oven at the same time, but once I had started I was determined to get them sorted. And Eight tests later, we got there!
These are the super delicious cookies that originally came in the tins everyone's grandma's used for sewing - but more buttery. The recipe only uses one bowl, and is essentially a whipped shortbread recipe, which is super fun to pipe out into little rosettes. The finished cookie is super tender and just a little crunchy (or you can bake it more to make them more crunchy). They are just so, so good.
I tested chilling and freezing the cookies ahead of time too and am happy to report that both work beautifully, so the options for preparing your cookies ahead are endless here.
These butter cookies make the perfect holiday cookie recipe, but I will definitely also be making them year round. If you're looking for a great recipe to mail - this would work perfectly!


Ingredients in Butter Cookies
The ingredients list for these cookies is almost identical to my super easy shortbread cookies, my thumbprint cookies and my snowball cookies - the difference between them all is the ratio of each ingredient to give a super buttery, tender cookie, which fits the brief. For this particular butter cookie recipe I wanted them to be crisp and buttery, but still be really easy to make and not be too hard to pipe out. We got there.
- Butter. This is the main flavour of this cookie recipe (hence the name, wild right?!), so this is your time to use good quality butter. I actually really like making these with salted butter, but if you use unsalted, make sure you include some salt.
- Powdered Sugar. Also called confectioner's sugar or 10x, using a fine sugar gives the cookies a super melt in your mouth texture without any visible sugar granules. You can sift it if you like but you're creaming the butter and sugar together so much that I just dump it in and let the mixer do the work.
- Vanilla. I use vanilla bean paste but if you have extract that will work too. I like to add it in with the butter and powdered sugar so that it gets nice and incorporated.
- Flour. All-purpose flour (also called plain flour).
- Corn Starch. I originally tested these with custard powder the same as my thumbprints and snowball cookies, but because of the amount needed the flavour was too strong. If you're in NZ or Australia, it's what we call cornflour!
- Salt. I always, always salt my baked goods.
- Heavy Cream. I use the liquid kind you use to make whipped cream. The cream just helps to loosen up the mixture a little to help you to pipe it out. I actually forgot it in the batch with the sugar in the photos and it was fine, but adding just a little bit does make it a lot easier to pipe out. You can use full fat milk if you don't have cream on hand.
- Granulated Sugar. If you like your butter cookies with sugar on the outside, then you can add it before and after baking. It gives a super delicious texture - My Husband ate many of these while I was recipe testing and recommends the sugar coating, especially if you aren't adding an icing or dipping in chocolate!
The importance of Room temperature ingredients
These are a shortbread based cookie, so they don't have a leavening in them (baking soda or powder, or sometimes egg is used to get lift and provide texture but this is an egg free recipe).
For this reason it is super important that your butter is properly room temperature. 'Standard' Room temperature is 22°c but you just want to make sure that if you press on your butter it leaves an indent of your finger. Using nice soft butter means that the butter and sugar mix will get nice and light and fluffy, giving a nicely textured cookie.
If it's super hot where you live make sure that your butter doesn't get too hot either, as it can get a bit sloppy if it is too warm when you go to make your cookies.

How to make Butter Cookies
These butter cookies are super easy to make - the mix comes together in one bowl, and takes less than 10 minutes to make. This recipe makes 15 cookies, but is super easy to double (or triple), if you like. It would be super easy to triple the recipe, pipe them all out, then freeze them unbaked and store in a container to bake off as you need.
This is an Egg Free recipe - I have a few on my site now, if you wanted to see the rest you can check out: Egg free recipes. Here's how I make these butter cookies:
- Cream together butter and sugar. You want it to be super light and fluffy - make sure that you stop a few times when you are mixing to make sure that the butter on the edges and bottom of the bowl gets included too.
- Add in dry ingredients and cream. Add the remaining ingredients and mix to combine with the mixer. The dough will be soft - we want this so that it's easy to pipe.
- Transfer to piping bag. A strong piping bag is essential here - there are notes down the post on all my tips and tricks on how to fill a piping bag!
- Pipe out the cookies. I did rosettes, but if you wanted to pipe out blobs or wiggles or something else fancy, I am sure that would work! I really want to try a smaller piping tip and try and make wreath cookies or bows but I'll save that for another time.
- Bake. I bake these straight away, but I also tested chilling the dough prior to baking (after piping out), and also freezing before baking, and both worked, which makes this butter cookie a super versatile girlie!


How do you tell when Butter Cookies are baked?
This can depend a little on how you like your butter cookies. If you want something a little softer, bake them for 13-14 minutes until they are set on the outside and just barely going golden.
If you like your butter cookies to be a bit more crunchy and snappy, increase the baking time until they are your desired level of doneness. I love the flavour of them both ways - the more baked ones get a bit more depth of flavour from the browning, but you do you here.
Remember that my baking times are a guide - every oven varies in temperature so make sure that you look for when the cookies are starting to go golden brown for when you pull them from the oven.
How do you store Butter Cookies?
Store your butter cookies in an airtight container at room temperature. Make sure that they are fully cooled before going into the container, as excess moisture that is released from them as they cool can cause them to go soggy.
The cookies will store for up to a week stored in an airtight container - I find that the taste develops super well too after a few days.
If you are wanting to make these to send or to store well, then make sure they are well baked - this will make sure they are nice and sturdy and keep their texture well when stored.

Piping Bag Tips and Tricks for making Piped Cookies
There are a few tips and tricks when it comes to piping out these butter cookies. The first time I did it, I had a total piping bag blowout - which came from the batter being too thick, but also from my piping bag not being sturdy enough.
I was using a compostable piping bag, which didn't work super well, so switched to a more sturdy one. I know you can get the canvas piping bags but I find they always smell weird so I don't use them - I do however wash out my plastic piping bags and re use as many times as I can.
I get my piping bags from a catering supply store - they come in a big roll.
Do NOT use a ziploc bag to pipe out these butter cookies. It will not hold up, and you will have a disaster on your hands.
Best Piping tip for Butter Cookies
I used an ateo #827 tip, which is an open star piping tip. You can use whatever tip you like, but I recommend using something on the larger side so that you can easily pipe the rosettes. The 827 has a 0.56" / 1.44cm opening. These butter cookies would also work with something like a french star tip, which is an ateco #867 (the first two numbers correspond to the shape and the last one corresponds to the size of the piping tip opening).
Can I use this butter cookie recipe for a cookie press?
I don't know sorry. I don't own a cookie press. You are welcome to try it, but I would suggest using a recipe that is developed specifically for use in a press. While the dough is fairly soft I don't know how soft it needs to be for a press.


How to fill a Piping Bag
Make sure you use a super sturdy piping bag for piping out these butter cookies. The easiest way to fill a piping bag is to add the piping tip, then place the bag inside a jar or container, and open the bag over the sides. This gives you a nice hole to add the batter too - I find this much easier than trying to hold it with one hand and fill it with the other.
Once the butter cookie dough is in the piping bag, I like to clip the end of the bag with something like a chip clip or a rubber band. This stops the dough from falling out the end of the bag and gives you one less thing to worry about when you are piping out the cookies.


How to Pipe butter Cookies
These butter cookies are pretty easy to pipe out - but you will need to use two hands to pipe them and squeeze pretty hard on the piping bag.
I piped three rows of five cookies - to pipe a rosette, hold the piping bag straight up and down over the surface and pipe a round of the butter cookie dough, finishing when it overlaps on itself. I prefer not to leave a hole in the middle - my rosettes came out at about 4.5cm in diameter. If you have a different sized piping tip or want to pipe them in a different shape you may end up with more or less cookies - make sure that you adjust the baking time if this is the case.
If you are finding the cookies hard to pipe out:
It can be a little hard to manage the piping bag when it is filled with the butter cookie dough. If you are finding this, it is easier to manage when there is less mixture in the piping bag, so start with about half the mix in the bag, pipe out your cookies, then add the rest. This is particularly helpful if you have smaller hands or struggle with holding things.
Troubleshooting hard to pipe cookies:
There are a few issues that can come up when you are piping these - the first is that if your butter is too cool, then the mixture will be hard to pipe out. Using less batter in your piping bag will help this.
Make sure that the liquid you add is room temperature. Adding cream or milk makes the batter slightly softer and easier to pipe - make sure that it is room temperature or it will chill the butter and still be hard to pipe.
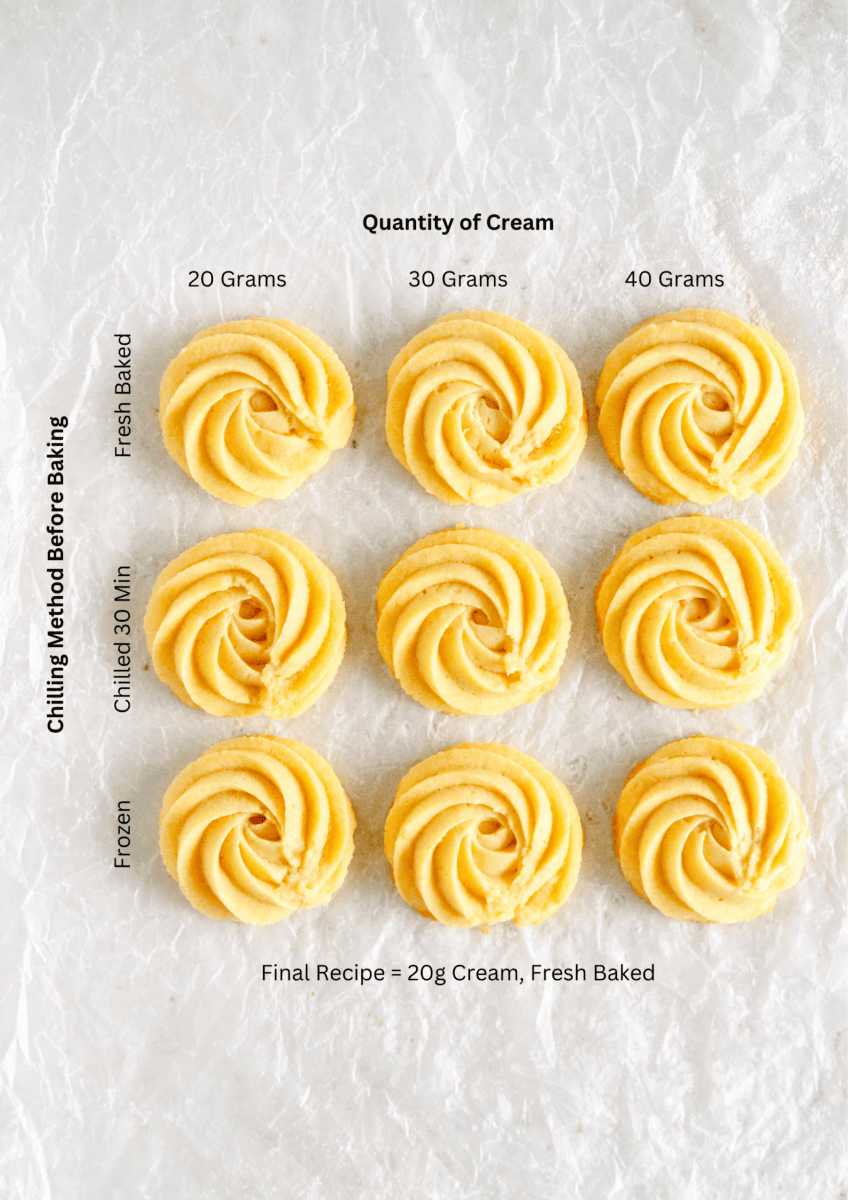
I did play around with adding more cream to the recipe to see if it would make them easier to pipe out - I went all the way up to 40g of cream and also tested chilling and freezing the dough before baking to check if that made a difference to the shape and texture of the cookies.
The mixture made with 20g cream was still my favourite (I find them not too hard to pipe) - if you do find that you are having a hard time and need to add a little more cream make sure that it is room temperature or slightly warm. You can see the results in the image below!
The butter cookies with more liquid took a little longer to bake and needed a little longer in the oven to fully dry them out so that they were nice and crispy so just keep that in mind! They were definitely a little softer in texture and didn't last as long as the ones with less liquid.
However if you are really having issues, you can increase the liquid up to 40g without any big changes to the outcome.
If you aren't happy with your piping:
This is one of my favourite parts about this recipe - if you aren't happy with how a rosette comes out, just scrape it off the parchment paper and pop it back into the piping bag. It will incorporate back in with the dough and you can try again.
Can I make these without a piping bag?
I haven't tried it. I would just make a different cookie recipe - my snowball cookies and my thumbprint cookies also use this super buttery dough and do not need a piping bag.
Ways to finish butter cookies - to sugar or not to sugar?
I tested these butter cookies both ways - with sugar and without, and we both preferred the sugared version. To finish with sugar, sprinkle the cookies with granulated sugar just before they go in the oven, and again when they come out of the oven to give them a second coating.
If you don't want yours to have the sugar, leave it off (or you can do half half, whatever you like here)

Recipe Testing for Butter Cookies
These butter cookies weren't even on my lineup when I made my list of cookies I was making, but when I started making my Thumbprint cookies and my snowball cookies I just wanted to see if the recipe can be used for a piped cookie too. It can't, but I was determined to crack it and I'm so glad I did because these are just so good. Here is my recipe testing process. I was testing these as half batches (grams for the win), and am thankfully married to a human compost bin, so had no issues with them not being eaten.
First test: Use base dough.
I started with the base dough that I used for my Raspberry Thumbprint Cookies and my Snowball cookies. The dough uses 20g corn starch / custard powder.
The dough was super hard to pipe out - I had more than one piping bag blowout. It held its shape ok in the oven, but I wasn't super happy with it. I wanted a dough that was easier to pipe, and so figured increasing the butter was the way to go.
Test Two
I wanted the dough to be easier to pipe, so I increased the butter in the recipe by 30g. These cookies didn't work at all - the dough was easier to pipe, but they all spread like crazy in the oven, regardless of how I tested baking them (freezing, chilling the dough, dropping the oven temperature etc). They were also a little too greasy.
I had two options from here - either add an egg into the recipe, or play around with something which will still let me keep the buttery texture but not have them spread too far in the oven.

Test Three.
I wasn't keen on adding an egg if I could get away with it - I like being able to offer egg free recipes and I didn't want it to take away from the taste of the butter and still keep the butter cookie as more of a shortbread base.
To get around this, I doubled the custard powder in the recipe, as a way to help soak up some of the butter in the recipe and provide structure.
This worked great, as you can see in the image down below. The recipe is exactly the same, but all I did was double the starch in the recipe.
I did however go a little too far - the custard powder flavour was super prominent and I wasn't a fan of it.
Test four.
Same as the previous test, but, I switched from custard powder to corn starch. It was still a little too much, and gave the butter cookie a texture that was a little too crunchy and also kind of turned to glue / dried your mouth out when you ate it, so I decreased the corn starch in the recipe to 1.5 times the initial quantity.
Test Five.
I decreased the starch in the recipe and baked the butter cookies straight away, and was super happy with them. The texture was perfect - nice and buttery but still stable from the corn starch, but not tooooo stable. However the dough was still a little harder to pipe so I tried adding in a little heavy cream to the mixture (I used cream rather than milk as it is higher in fat), just to help thin the dough out a teeny bit. It made it easier to pipe without making too much of a difference to spread. Both work if you don't have cream or milk on hand!
Test Six / Seven / Eight
Once I have a recipe down I usually make one or two more batches just to make sure that I have it totally nailed, and also to test the storage / freezeablility of the recipe / if chilling helps or makes a difference etc.

Can Butter Cookies be made ahead of time?
Yes! They can! These butter cookies are Perfect for making ahead of time - I tested them a bunch of different ways and photographed the results for you.
Baked Fresh.
My final recipe has you bake the cookies off straight away. I am impatient when it comes to chill time (but will happily spend hours latticing individual pies, don't ask me why, spicy brain life) and often find workarounds for chilling cookie dough etc if it doesn't need it. If you see me call for a chill time in a recipe, just know I've probably tried five times to avoid it before giving in.
Baking these cookies from fresh works great - if you want cookies in 30 minutes, use this option. It's the option I'll probably use the most often unless i'm preparing a bunch of stuff ahead of time.
Chilled before baking.
However. If you chill these butter cookies for 30 minutes after piping them out and before baking, they will hold their shape better. Texturally it does not make a difference, but as you can see from the images below, the cookies that were chilled before baking don't sink down quite as much, and are a little more detailed in their design from the piping tip. The baking time and temperature are the same.
Frozen before baking.
I tested freezing the cookies before baking, and this also worked super well - the cookies hold their shape with minimal spread. I was super stoked that this worked as well as it did because it means that you can easily make a big batch of this butter cookie recipe, pipe them all out, freeze, then store in the freezer in a container and just bake off as you need.
If you do freeze the cookies before baking, you will need to add a minute or two onto the baking time. I didn't drop the oven temperature when baking from frozen so they do end up a little more golden brown, if you are wanting to avoid this I recommend baking them from frozen at 300°f / 150°c and increasing the baking time slightly.


How to store frozen butter cookies.
If you wanted to make this recipe and freeze to bake later, pipe out the cookies as directed (you can space them closer together), then freeze on the pan until the cookies are solid, then peel off the parchment and transfer to an airtight container. They should store in the freezer for up to 3 months. If you want to add sugar to the outside of the cookies, do this just before they go into the oven.
Can I freeze the baked cookies?
I haven't tried it - I think they would be best baked from frozen, but if you do, freeze in an airtight container for up to 3 months then defrost at room temperature. Omit the optional sugar coating if you are freezing as it will go weird in the oven.

Frequently Asked Questions
What tools and equipment do you use?
You can find a full list of the tools and equipment I use on my products page
Can this recipe be used in a cookie press?
I haven't tried it sorry, as I don't own one. However, with how it can be piped, I think it would be ok to use in a cookie press to make spritz cookies? If you do try, please let me know, but i'm not 100% sure on this one sorry.
Can I ice these butter cookies?
Yes - if you wanted to finish them with a glaze, my 2 ingredient sugar cookie icing would be perfect here!

For more Holiday Cookie Recipes, check out:


❤️ Made this recipe and love it? ❤️
I would LOVE for you to leave me a review and star rating below to let me know how you liked it! Also, please make sure to tag me on Instagram!
Answers to your baking questions
Over the years, many of you have asked me questions about:
- baking in grams
- adjusting oven temperatures
- what kind of salt to use
- and many more!
I've curated and answered them all for your easy reference in this frequently asked questions post!

One Bowl 30 Minute Butter Cookies
- Author: Erin Clarkson
-
 Prep Time: 15 minutes
 -
Cook Time: 15 minutes
-
Total Time: 30 minutes
-
 Yield: 15 Cookies
 -
 Category: Cookies
 -
 Method: Baking
 -
 Cuisine: American
Description
These super easy butter cookies use one bowl, six ingredients, and make a tender and buttery butter cookie with a melt in your mouth texture. These butter cookies can be piped out and baked fresh, so ready in just under 30 minutes, or they can be prepared ahead and chilled or frozen until you are ready to bake them. Finish them with granulated sugar, dip half in chocolate, or add your favourite glaze or icing.
Ingredients
- 200g salted butter, at room temperature
- 70g powdered sugar / icing sugar, sifted if lumpy
- ½ tsp vanilla bean paste or vanilla extract
- 210g all-purpose flour, sifted if lumpy
- 30g corn starch
- 20g heavy cream or milk, room temperature.
- Granulated sugar for finishing, optional
Instructions
- Preheat the oven to 325°f / 165°c. Line a baking sheet with parchment paper.
- Fit a large sturdy piping bag with a large open star tip of your choice - I used an ateo #827.
- In a medium bowl using an electric hand mixer, or in the bowl of a stand mixer fitted with the paddle attachment, whip together the butter, powdered sugar, and vanilla on medium to high speed until light and fluffy, stopping to scrape down the bowl once or twice during the process to ensure it is well mixed.
- Add the flour and corn starch and mix with the mixer to just incorporate. Add in the heavy cream, and mix again to combine.
- Transfer the mixture to the piping bag - I find the best way to do this is to put the piping bag into a glass jar or deli container and fold the edges over the sides of the glass to give an opening. Use a bench scraper or something similar to push all the mixture to the end of the piping bag. Secure the end with a clip if desired.
- If you would like, use a tiny bit of the batter to hold your parchment paper down on each corner to stop it from moving as you pipe.
- Pipe out the cookies - I did three rows of five cookies. Pipe each into a rosette - hold the piping bag straight up and down, then using even pressure, pipe a circle of dough until it loops back onto itself, finishing with a little flick of the wrist. The rosettes should be about 4.5cm in diameter but this will depend on the size of your piping tip.
- Leave a little room for spreading. Repeat with the rest of the cookies. If you are not happy with one, just scrape it off the parchment paper and pop it back into the bag and try again.
- Once all of the cookies have been piped out, sprinkle with granulated sugar if using, then transfer to the oven. Bake for 13-14 minutes, until the cookies are set and lightly golden brown around the edges. If you like a more golden brown and crunchy cookie, increase the cooking time slightly.
- Remove from the oven, and if you put sugar on them before the oven, give them another coating hot from the oven.
- Leave to cool on the pan for 15-20 minutes then transfer to a wire rack to cool completely.
- Store butter cookies in an airtight container at room temperature for up to a week.
Notes
If you only have unsalted butter, use that and include ¼ tsp salt in the recipe - add it with the flour.
Corn Starch is called cornflour in New Zealand and some other places.
Heavy cream is the one that you use to make whipped cream. If you do not have any, you can use full fat milk, or I have also made them without and they worked ok, they were just a little harder to pipe.
If you are having a hard time working with all of the dough in the piping bag at once, you can take a little out and add as needed - this will make it a little easier to pipe.
The post One Bowl 30 Minute Butter Cookies appeared first on Cloudy Kitchen.


